Paris Fashion 2015: Gentlemen

b146bf56ec80af8aee1250e17fa3d516


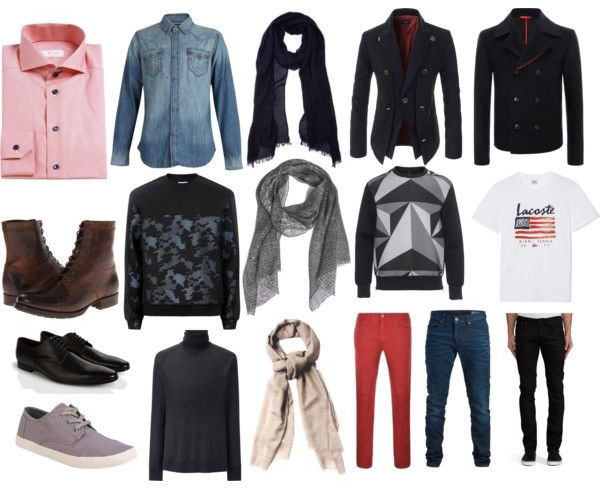
Round 2 for Paris fashion – this one’s for the boys! Parisian guys in their 20s dress pretty similar to guys in Seattle, but there are a few tweaks that are pretty “French.” Like I said, there isn’t any way that I could all encompass everything a city of millions wears, but these are the trends that I’m noticing while I’m walking the streets of Paris on a day to day basis. So here we go, gentlemen!

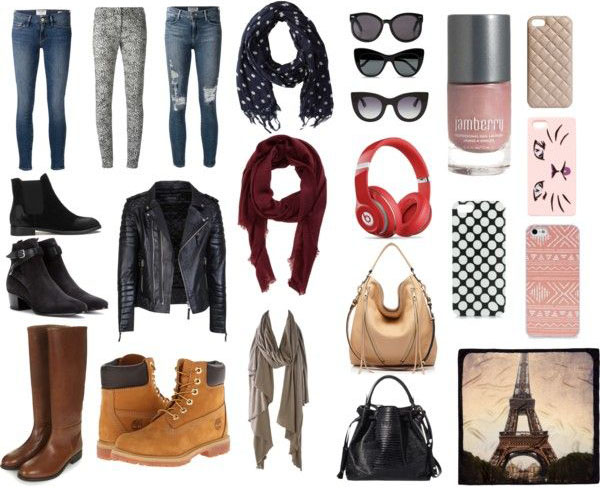
1. Scarves: Guys and dolls alike all rock scarves in France. Whether it’s a earth tone neutral, a subtle print or a pop of color, the scarf is something you hardly ever leave the house without. There are several ways one can tie a scarf, gentlemen – for further instructions, though, I refer you to one of my personal favorite websites: The Art Of Manliness.

2. Shoes: As far as shoes goes, the key is to make sure they’re of good quality and well made. Whether they’re a sneaker, a dress shoe (oh my word – there are some beautiful dress shoes in this country) or a pair of leather boots, just make sure they’re in great condition (that doesn’t mean new, it means shined, oiled etc.). Grubby is not the way of the Parisian man.

3. Shirts: Graphic t-shirts are acceptable, if you’re mixing them with some nice jeans, but the print needs to be a high quality and have some kind of illustrative narrative. Use your intuition when you’re choosing these tees! Make sure they aren’t screaming for attention, but are commanding it nonetheless. Remember: “Try your best without looking like you ever tried.”  *You get extra points if you grab one with an “ironic” American flag on it.

4. Sweaters: Sweaters are a staple of your wardrobe that you’re able to wear year after year. Not only are they a trendy choice, but can add some patterns to your wardrobe. Don’t look for your Bill Cosby inspired soulmate, though (as charming as that might sound) – grab that pattern in a neutral charcoal or beige. Another great option is a pop of color such as a solid red or turquoise.

5. Turtlenecks: Yep. It’s on here. You knew it was coming. French men are not afraid of turtlenecks, and they wear them proudly. Whether this lightweight style buddy is standing alone as your outfit top, or it’s matched with a sweater over it, you’ll be well on your way to dressing like a Parisian with a couple of these in your wardrobe.

6. Button-ups: First things first: Grab a pink one. As with the turtleneck, you must not be afraid to sport the pink shirt if you’re going to rock the Parisian style. Other great button-ups can include denim, and smaller prints and patterns.

7. Coats: Peacoats right now are pretty popular, the key is to have them fit like a glove. Oversized is not an option. Colors are generally dark blue, black or gray. The leather jacket (of course) is a must have for your wardrobe, but we’re not talking biker tasseled vintage model. Again, you might have to throw down some cash to get the right fit, but the nice thing about leather is that once you commit it’s until death do you part.

8. Blazer: Tastefully mixing business wear and casual wear is a trend that doesn’t seem to be going anywhere. The “tasteful” part means making sure your pants, jeans though they may be, are fitted and pull together your outfit, rather than distracting from it. And speaking of pants…

9. Pants: Go ahead and stick with a jean, but why not try a pop of color with that jean!? Red? Turquoise? Green? One of each? Colored jeans are definitely a thing, although I’m seeing them a little less now, while they seemed to be more popular a few months ago. If you’re not up for the colored jean, you can grab a dark wash pair but it is going to need to be fitted. And if you’re REALLY daring, grab a pair of skinny jeans – no, not paint on tight, but just a bit tighter than a straight leg. You’re not trying to mimic your high school emo days.

10. Bags: Messenger bags, canvas or leather are THE thing to have. Parisian men carry bags a lot more than I’m used to seeing in the U.S., but why shouldn’t they!? Men have things to carry, right? So why not have a great briefcase style handbag or crossover bag to carry them!

Notice some other Paris mens trends that I’ve missed? Write them below in the comments box!

Paris Fashion 2015: Ladies

26756e31dbc5e4d431c5df96f9e0eaa2So, you want to dress like a Parisian? Well great, because I happen to live in Paris and  LOVE fashion (so much that I have a college degree in it). Living in Paris has been such a struggle (#firstworldproblems) because I love fashion, but I am/will be absolutely broke while I’m living here. So no Paris shopping sprees for me, as much as I would love to. (That being said, I have bought a few choice items that I’ll love forever.)

Today when I was sitting on the metro, drooling over a girl’s shoes, I thought: People probably want to know what’s going on for this side of the pond, right!? So, from one fashion addict to another, I’ve decided to fulfill your dreams and desires. At least, from my perspective. There are obviously a lot of different clothing choices, and it’s hard to just make a “quick list” of everything, but here are some of the items/trends that I see on a day to day basis!

1. Scarves: The stereotype about Europeans wearing scarves is true, and I’m so glad. A scarf is one way to throw in a print, a different texture or just some fun into your outfit, and the French are great at it! Since French people generally seem to spend more money on statement items, scarves are also a great way to inexpensively add new flavor to an otherwise neutral colored outfit! And speaking of statement items…

2. Leather Jacket: Let’s talk leather jackets! Oh my word. Everyone has one, and they are BEAUTIFUL. I’m absolutely in love with leather in general, but I love the jackets that are effortlessly thrown over a spring dress or a cute flowy top. It is my firm belief that buying a well fitting leather jacket is a kind of rite of passage into womanhood (I do acknowledge my animal rights friends who won’t like this – but it’s my opinion, sorry!).

3. Boots: The trends that I’m seeing a lot of right now, in Paris, are ankle boots of every style though mostly black and brown. Again, leather (bien sûr!). I love that the French keep fashion simple while using detailing to tell their fashion story, instead of overindulging in frills and whistles (save that for the buildings). Another thing on the hot item list are simple leather riding boots (generally a lighter brown) that are knee high. Trending: Timberland logger style boots – try them with some floral skinnies for a soft and sweet/kick ass style punch. And speaking of skinnies…

4. Jeans: Skinny jeans are here to stay…at least for now. The twenty something Parisian woman has dark colored jeans that fit just right. You can tell that she’s spent the time and money to find her brand and her fit. I’ve heard that 70s bell bottoms are coming back, but I haven’t seen them on the streets, yet. I have, however started to see the return of the overall – talk about 90s flashback.

5. Phone Cases: Whether it’s an iPhone or a different smart phone, the case is another accessory that just can’t be ignored. Just think how often you’re pulling that out every day!? The cases I’m seeing are generally geometric with a neutral color or solid with a pop of color. While prints don’t seem to be as popular, there are some minimalist ones  I’ve seen that I love.

6. Nails: Speaking of the hands that are holding that trendy phone, French nails are well kept – although not as overly done as to look it. If there’s one motto for French style it’s:

“Try your best without looking like you ever tried.”

Either keep the color a solid dark dramatic, a pastel spring shade or natural with just a clear coat of polish. No patterns, no crazy long fakes. Work what you’ve got, lady!

7.  Headphones: If you’re riding the metro and want even a chance of hearing that latest indie song you’ve been waiting to get released, you’re going to need a good pair of headphones, and for many French women (and men!) that means grabbing a pair of Beats By Dre. Once again, these are quite the deposit piece, but quality over price? You decide.

8. Purse: Shoulder bags (dare I say it – leather?) and canvas totes are the most common purses that I see walking the streets of Paris. Whether it’s a cute screen print or just a basic tote, canvas book bags are very popular right now for the 20-something Parisian. As for handbags, they run across the scale, but are generally another piece that is invested in.

9. Sunglasses: Black, darling. Always black. Whether it’s a cat eye or a circle lens, black sunglasses are classic and may never go out of style. On Paris streets they’re almost exclusively worn, and it’s unlikely you’ll find other colors or designs nearly as much.

10. Hair: The French do, I’ll admit, have a better hold on hair than Americans. Why? Because they just let it be. Yes some dye it, or do other little tweaks, but as a whole hair here is loved as is, and I love that. The key to French hair is to take care of the hair you have. Whether that means moisturizing, having a great hair cut or shaving it down short the French own their gorgeous locks and that’s a love you can’t help but have rub off on you.

Have some Paris fashion trends you’ve noticed!? Add them in the message box below!

6 Reasons To Set Goals

DSC_0544

Somehow Wednesday has snuck up on us! I have about the motivation of a slug right now because; well…let’s just say 2015 hasn’t started the way I thought it would. Maybe that’s a bad thing; maybe it’s a good thing. But it is, without a doubt, unexpected, and that’s never an easy thing for me.

But that’s life, right? We have no other option than to move forward with what we have, striving to build bigger and more structurally sound things in spite of the rubble that surrounds us.

On Sunday I got a really amazing opportunity to hear a speaker who was talking about the importance of goals. Obviously, being the beginning of the year, it was an appropriate topic – especially since I feel like 2015 hit and I lost all ambition to do anything productive. Is that just me? Anyone else out there just feeling over it (whatever ‘it’ is)?

But anyway, the speaker outlined 6 reasons to set goals and I thought I would share them here (with a little commentary) because they’re awesome and I think worth being spread around the Internet. So here we go:

Six Reasons To Set Goals:

  1. Because it’s necessary

“Either you go forward on purpose, or you sit by and let things happen to you. Either you take control, or other people take control of your life for you.”

It might sound like a no brainer, but if you look at the actions of great men and women throughout history you will notice that they had great goals that got them to their places of greatness. It’s when we don’t have goals or a direction pointing our lives that we go off path and end up places we might never have wanted to end up. The best part of goals is that they are entirely free – they cost nothing, but can change everything.

  1. Objectives stretch our faith:

“Take the limits off your dreams. Instead of running after small dreams, lets fix big goals.”

If you don’t dream big, you’ll never achieve great things. As a Christian, having my “faith stretched” points to my faith in God, but I think it goes beyond that even. Having goals and objectives stretches our faith in humanity, in the future and even in ourselves! Having goals allows us to have milestones, or markers that show us where we were and where we are going. They remind us: We did that. And encourage us to dream even bigger the next time.

  1. Goals concentrate our energy

The fact is, as much as we would love to, we can’t do everything at once. And spreading yourself over acres of ideas generally does more damage than help. Having goals allows us to knock things out one at a time and allows us to take steps forward.

  1. Goals allow you to keep going when you want to stop

“If things aren’t going well, then it’s not the end yet.”

If you walked into my bedroom you wouldn’t really see anything particularly eye catching, but if you came inside, and shut the door, you would notice an entire wall collage of ideas, quotes and inspiring things on the back of my door/wall area. It’s important to list things out, write things down and remember the people and things that inspire you. Because when you have milestones, or people holding you accountable, you’re far more likely to stick with whatever goals you have.

  1. Goals build character

“What I’m becoming is much more important than what I achieve.”

Even if you fail miserably, if you learn about yourself in the process you have succeeded. It might not feel like it right then and there, but the fact remains: You having tried puts you miles ahead of those who never got off life’s ‘couch.’ When we get up again after failing it’s THEN that we grow. Success is great, but failure is often the much better teacher.

  1. Having the right goals will reap rewards

Whether you’re of a religious mindset, and you believe in the reward of heaven, or not – the fact remains that when you work hard toward things that allow you to love, grow, serve others, discover and grow in character then you will be amazed by the results of the rest of the world. I’m a strong believer that the good you put out into the world comes back to you; let’s all try to sow a little kindness back into the communities we surround ourselves with.

STAY TUNED – UPCOMING TRIP: AMSTERDAM THIS WEEKEND – Eeeek!

Applying For A French Au Pair Visa 101

10524739_10203720435624796_270799082396653388_n

Since applying for a French Visa (Au Pair) was one of the most stressful events of my life, I thought I would share some insight, so those of you thinking about doing the same might have an easier time. There are a lot of outdated resources out there that are way less than helpful, because they have you running around getting paperwork that you don’t even need. Here’s an updated list of paperwork you WILL NEED for the French Consulate  (in San Francisco as of August 2014)

Things you NEED to apply for an Au Pair Visa: 

1. Visa Application Form: First things first, make sure you print out and fill out the application form and attach a passport style (color) photo to the top right corner. Make a copy.

2. Your Passport: Sounds like a no brainer, but you will need to bring your passport and a copy of the identification pages when you go to apply. Make a copy.

3. Contract: Make sure you have an approved contract signed by you, the family you’ll be working with, and validated by the local DIRRECTE where you plan on moving (in France). Make a copy.

4. Flight/Travel Plans: You’ll need to have proof of plane ticket purchases, OR written plans of when you’ll be traveling with a signed statement that says you won’t leave the country before you receive your visa. Make a copy. 

5. Letter of acceptance from a French Institution: As an au pair you will be required to be enrolled in language/culture classes while you are working in France. I decided to enroll in a 1 year program at a language institute at the University near where I’m going to be living. Make a copy. 

6. OCII form: Once you actually get to France, you will need to get this form validated within 3 months of getting there. When you apply, make sure to bring it with the top part filled out.

6. Self addressed prepaid express mail envelope: You’ll need this for getting your passport and visa back (unless you decide to go back to the embassy and pick it up). Make sure this is from USPS (not FedEx or UPS) and does NOT have the mailing label stuck on it (this way they can give you your tracking number).

7. Processing Fee: The easiest way to pay this is by Visa, but they also take personal checks. For me this fee was $136.

Things you WON’T NEED: 

Certificat Médical: Some Au Pair websites told me that I would need to get a signed document of health for applying for my visa (within three months of applying) but they never even asked me for this when I was applying, so don’t worry about it (unless you really feel like going to the doctor for a physical).

Extra Passport photos: Other than the photos in the top right corner of your application, you shouldn’t need any other passport photos.

Bank Statements/Guaranteer: This was my ALL TIME stress because some websites stated that I needed to have the total amount of $820 x 12 months I’m living there in my bank account before leaving, OR someone to notarize a statement saying they would be available to provide that amount given the need. NOT NEEDED.

CampusFrance: This is NOT FOR AU PAIRS. And it is a stress and four week waiting + $100 dollar waste of your time. I cannot believe I waited so long for this paperwork, just to find out that it wasn’t needed.

Diploma: Some sites stated that I would need a printed copy of my last diploma (so, University) when applying. NOT NEEDED.

Might want to bring (BUT DON’T NEED) if you’re OCD, like me:

Receipt of Booking: You don’t really have to have this, but I brought mine just in case (for some reason) they tried to say that I hadn’t made an appointment. Proof on paper is generally a good rule of thumb.

Proof Of Residence: I didn’t need this when I was applying because my passport has my Washington State address on it, already. BUT if you’re from a different state originally, and are applying for a visa within the district of where you’re living now, you’ll need to provide proof that you live there. This can include a copy of your drivers license or state ID (refer to consulate website for more examples).

A Pen: Just in case you’re sitting in the waiting area and realize you forgot to fill something out. Which may or may not have happened to me.

For more information visit your Consulate’s webpage (or email them). Here’s the link for mine (San Francisco): CLICK HERE

REMEMBER: This is a list based off my personal experience at the San Francisco French Consulate, consult your local consulate before making an appointment to double check you have everything you need!

My Au Pair Story

1090931_10201244334243809_98384347_o

I realized today that I haven’t ever formally shared my story about how I became/am becoming an au pair in France. It’s pretty brilliant, so hold on to your seat. As all good stories do mine starts with:

“Once upon a time …”

I got laid off from my job. Ha. They gave me one week notice, which is insane and possibly illegal (at least morally). Needless to say,  I hit panic mode. I applied for any and every job I could even remotely be qualified for. Then, when nothing happened, I started applying for jobs I was only meagerly qualified for.

This is when I stumbled on adds for taking care of kids. “I can do that,” I thought, “how hard can it be?” I was raised in a family of 5, with a hard working teacher for a mother, and the responsibility of partially raising my younger siblings, so becoming a second “mother” to random kids seemed like a natural enough transition. While applying, I decided I only wanted to work with larger families (3+ kids) so I didn’t get bored. And when I found one that said 5 kids, I knew it was perfect. I don’t know why, but in my mind I convinced myself that the more kids, the busier I would be, which would make working so much easier.

So I emailed off my resume. And got a response! I went in for an interview that week and it went great. They said they would email me back that week. So I waited. And waited. And waited. I think it was somewhere around a month later that I heard back that I got the job. It was nerve wrecking to say the least – mainly because, after months of no work, I had eaten through my savings and didn’t have the next months rent.

When I first started working as a nanny I thought I would work there for 1 year tops, since that was what my contract was for. As the months went by, though, I realized I may need to stick around for a bit longer. See, the family only consisted of 3 kids when I started, all biological children to the parents. Within 6 months there were two more who had been adopted from Africa.

For those who know about adoption, you know it’s a huge transition. There are a lot of aspects that have to come together to make it work, and one of them is the stability of the people around the kids. So I gave myself the time limit of 2 years. After that I would have to move on. It wasn’t that I hated my job, but I’ve seen people get comfortable in “good” jobs that are going nowhere and only realize 5 years later that they’ve wasted their time.

This year, at about 1.5 years I started wondering what I was going to do next. I love my job, and I was determined not to leave it unless something amazing came up. There was no way I was ever going back into the world of zombies, windowless cubicles or retail.

One day, while I was making dinner, my roommate asked me about whether or not I was still thinking about becoming an au pair. I had completely forgotten that I ever wanted to do that (although I have since I was a kid), or that I had told her about it being on my bucket list. But I thought, “What the hell? I have nothing else going on in my life right now. Why not see what happens?”

I hopped on Google and typed in “Becoming an au pair” and clicked on the first link that came up – a site called AuPairWorld. When I first started filling out the profile, I did it as kind of joke. I didn’t think I would get any responses, and I had no hopes about finding a family. But, within 24 hours, I had three families asking for more information and whether I would Skype with them. I couldn’t believe it!

I set up some interviews with families and found some amazing people, but it wasn’t until a few days later that a family in a little town south of Paris sent me a message. They seemed like the sweetest family on earth, and as soon as I had Skyped with them I was sure that they were the family for me. Although the glamour of living directly in Paris seemed like it would be a great experience, I remembered how overwhelming London was for me, and I knew that the countryside was a better fit.

Becoming an au pair in France is a lot harder than it sounds. There are mountains of paperwork, hurdles to jump over and red tape to tangle yourself in. But, through it all, I’ve been so lucky to have an amazing French family to work with. I feel so empowered knowing that I’m taking a directional step in my life; one that is going to produce boat loads of stories to tell my kids someday.

If you’ve ever considered becoming an au pair, I would highly suggest the website I went through. It’s completely free to make a profile, and provides a platform for you to meet families, and for you to talk to them beforehand in a safe space. If nothing else, it’s an awesome opportunity to see what your options are!

It’s crazy to think that six months ago I had no idea where my life was headed, and now I’m on my way to Europe. Sometimes crazy things, like getting laid off, land you in places you never thought you’d be. But the beauty of life, is that those places sometimes lead to better opportunities than you could have imagined.

373857_2675893809976_759427527_n
Seattle, WA

Seven Ways To Renovate Your WordPress Blog

Screen Shot 2014-05-05 at 12.04.16 AM

If you’re revisiting my blog from last week, you may notice there are some differences. I spent all yesterday pulling together ideas I’ve been dreaming about, and I’m absolutely in love with the results! That being said, there are still a ton of things I want to work on, but baby steps, right?

Since it took me 12 million hours to find all of the information and put it together, I thought I would write a post today about what I did. Hopefully I can save all of you guys some time and trouble if you decide you want to do some renovations of your own!

1. Updating your header

cropped-darkkhorsedesigns2.png

Headers are important because they are the first thing people see when they come to your blog. Depending on what your blog is about, and what you want aesthetic you want to portray through your blog, these can be a lot of fun to design! For me, I really wanted a “journal” like feel because that is, more or less, what this is. I love minimalism and was excited to use the same font that I have tattooed on my arm! The arrow that is underneath the font I sketched in my notepad, then scanned, then opened in photoshop and added to my original text piece. Note: Since the arrow is so thin, it was hard to crop it down the original drawing. If I had had a pen tablet I think it would have been a lot easier and faster.

2. Creating a background that stands out

Glasgow, Scotland
Glasgow, Scotland

Honestly, I watched so many tutorials on finding the perfect background for your blog. I was really excited about creating the perfect background using all kinds of technology but, in the end, it was a picture of Scotland that stole my heart. Here’s one of my favorite non-photoshop needed tutorials I found for designing your own blog background, if you do decide designing is the direction you want to go in!

3. Adding Social Media Buttons

Facebook Icon

Instagram IconPintrestIcon TwitterIcon EmailIcon


Holy hell, this took me four hundred years to figure out. Mainly because everywhere online that I looked told me that the only way to have the cute little social media icons was to buy a blog domain, buy a blog upgrade or promise my firstborn child to the devil. Since I wasn’t willing to do any of the above options, I decided to keep looking until I stumbled across this glorious tutorial. Even though it’s for Blogger, the same idea works for Worpress, and if you’re having trouble, you can always go make a free Blogger account and then just transfer the HTML. To find the “buttons” themselves, you have a few options:

1. Design the yourself on Photoshop – I would keep them at about 50 pixels x 50 pixels

2. Buy them on Etsy (they send you the files after you buy them online)

3. Google “Free Social Media Blog Icons.” Cut and paste.

Here’s the Tutorial I used:

4. Find the perfect profile picture

BlogProfile

It was pretty hard for me to find a decent picture to put up on my blog because I don’t necessarily have that many of myself, standing alone, posing. Luckily, I recently went galavanting around the city with my best friend, and she stole my camera a couple of times, resulting in the picture I now have. In order to get a square picture into a circle I used Photoshop and this tutorial.


5. Choosing the perfect template

Screen Shot 2014-05-04 at 11.49.25 PM

First go to your left hand Dashboard>Appearance>Template

Honestly, WordPress has a pretty terrible selection of templates to choose from compared to what they used to have. Most of the good ones cost over $80 and I’m just not willing to spend that much money on a blog (especially since I’ll probably change my mind as soon as I buy it and want something else). Instead, I played around with each of the customizable features for the free templates, before finally deciding to use the one I have now. In addition, I did kind of spoil myself and spend $30 so that I could change the background and the fonts to what I wanted. The nice thing about WordPress is that you can play around with what this might look like before you make the commitment to pay anything. The $30 is a once a year fee. I rationalized it because I know I’m going to be spending a lot of time on this blog over the next year(s) and I wanted something I could take pride in.

6. Widgets!

Widgets (or the little things you find in your side bar) are your absolute best friend. Playing around with these can allow you to add HTML, picture albums, links to your Twitter or Instagram and all kinds of other goodness. Here’s a picture of what my widget bar now looks like, so you have an idea of what I’m using.

Screen Shot 2014-05-04 at 11.33.24 PM

Screen Shot 2014-05-04 at 11.33.41 PM


7. Organize Your Blog

Screen Shot 2014-05-04 at 11.51.29 PM

A lot of what I did yesterday was just taking the time to organize and make sure all the little details were to my liking. For instance, I had pictures on the side bar before but they were in a staggered messy bunch that I now (hopefully!) straightened out to be more appealing to people who are looking through them. I honestly believe the best blogs are the ones that just pay attention to detail.